- Premiere Tutotial
How to Add Grid Effects in Adobe Premiere and FilmoraPro
Aug 29,2019• Proven solutions
Have you ever used Photoshop or After Effects? If you have, then, you are surely aware of the grid effect. The grid and guides effects help in aligning the whole thing within your production. It is an important and effective tool for Adobe Premiere. However, some people in forum still don't know how to add grid on Premiere. You can use it to do many things. In this article, learn how to add grids and guides effects in Adobe Premiere.
Recommended Grid Effects Maker - FilmoraPro
When we are talking grid effects, in fact there is a much easier way to add it to your video than Premiere. FilmoraPro is designed for professional video editors or semi-pros. With FilmoraPro, professional video editing made easy. You just need to drag and drop effects to timeline and blend mode to get what you want. The steps are easy to start.
- Open FilmoraPro and drag video file to timeline.
- Go to Effects to find Grid. Drag and drop to video file.
- Adjust grid preset, position, color, blend and more.
Now, download FilmoraPro to have a try (Free)!
Part 1: Why You Need Grid Effects
Easily Balance Your Design
When you use grid effect, your designs are evenly placed and are consistent. Your design is placed on a symmetrical layout when divided into a number of columns. It gives you the complete understanding which part of the design is overshadowing the other. You are able to judge, the flaws of your design and correct it for perfection.
Enhance the Visual Order with Grid Effect
People often assume that when your design is placed on the grid, each and every part of the design is divided into equal blocks which might supersede each other. As it is evident that hierarchy is vital for any design and there are at least 3 levels of it, the grids and guides effects speed up the process of hierarchy and make it easy for you. With the use of the grid effect, you can attract attention towards particular things and also drift attention away from certain things.
Part 2: Steps to Add Grid Effects
Below are the steps to add grid effects. It is easy to have the effects that you want if you follow the instruction.
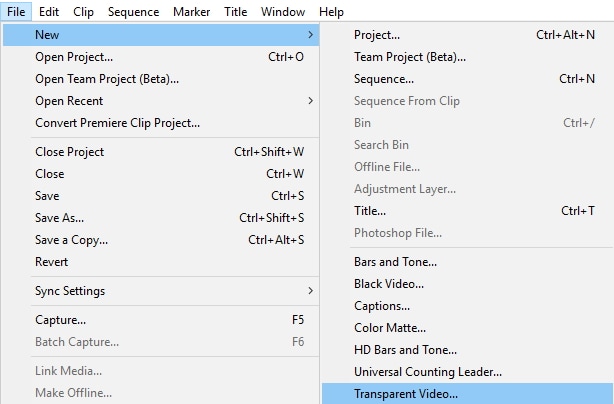
Step 1: Firstly, add your image or clips to create a sequence like a movie. Decide a point where you want to start your grid. Take your cursor to File and select New and then select Transparent Video. Drag the transparent video from where all your other footages are present on the timeline.

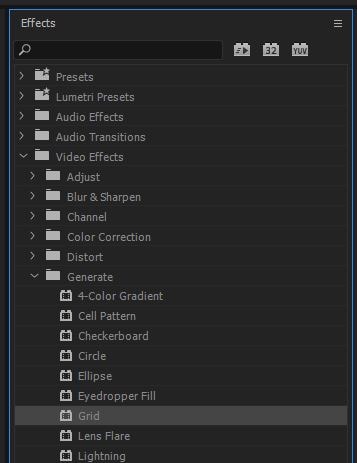
Step 2: Search the Effects option and select Grid Effect. Or you can find Video Effects > Generate > Grid. Drag the Grid Effect on the transparent video. Select Effect controls to adjust the grid on the footage.

Step 3: Get a finer control on the Grids by changing the size from to Width & Height Sliders. Lower the opacity to make the foreground easy. Add your text or effects by using the grid
Conclusion
The grids and guides effects are not a built-in feature in Adobe Premiere but by using some amount of creativity, you can add the grid effect to your design easily. Follow the above steps to add your individual grids and enhance your work.
Bring up your video to a professional level with straightforward tools.
Try It Free Try It Free


Liza Brown
chief Editor
0 Comment(s)